Docker orchestration with maestro-ng at Kabbage

I also posted this over at our Kabbage Tech Blog

At Kabbage, my team loves using Docker! We get a ton of parity between our development, testing and production environments.

We package up our code, configuration and system dependencies into a Docker image. That image becomes our immutable deployment unit.

I’ll cover how we build and package repeatable Docker images in another post. For now lets talk about how we deploy and run these images.

Too many cooks options

You have many options for managing the deployment and operation of your docker images. Early into our first Docker project, I assumed we’d use Shipyard for orchestration.

It had a nice GUI and an API. I’d planned to script Shipyard’s API to get the images and containers onto the hosts.

I found out the hard way that Shipyard can’t pull images onto remote Docker hosts! I thought for a hot minute about scripting something to handle that part. But that seemed more complicated than it was worth.

So I started running down the list with not much time left to get a working solution…

Panamax.io — Had a GUI and an API but seemed way more complex than what we needed.

Fig/docker-compose — We were already using fig for our local development environments. Managing remote docker hosts isn’t its strong suit. It’s possible but slow because you deploy to each host in sequence.

Centurion — Looked promising. It was fig, but for remote systems. New Relic wrote it so it’s got some real-world usage. But the first thing I ran into when using it was Ruby traceback. I could’ve spent my time diagnosing it, but I had one more tool to try out.

maestro-ng — Looked a lot like Centurion and fig. It could pull images onto remote docker hosts, check! It’s written in Python, so if I ran into a problem I had a better chance of fixing the problem quickly.

Maestro-ng’s the winner

Maestro is a lot like fig. You configure your container — which image, environment variables, volumes, links, etc. — in a YAML file. You also configure the remote docker hosts, or “ships.”

Screenshot 2015-04-07 17.07.53

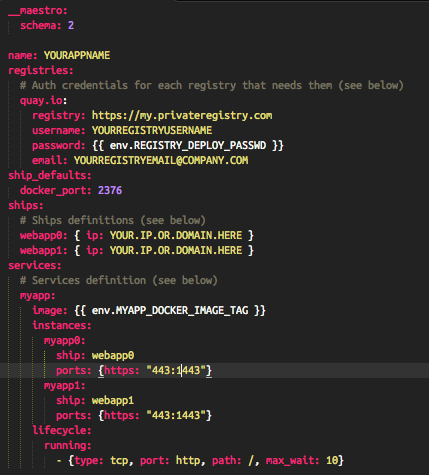
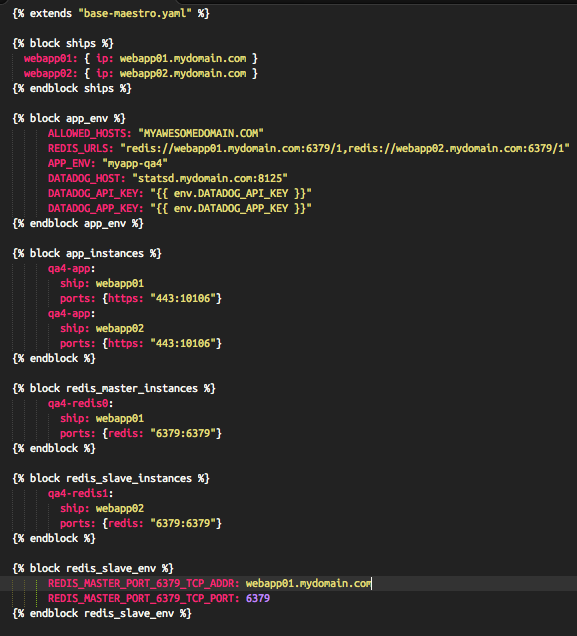
Plus, under the hood the yaml files are treated as Jinja2 templates. You can keep your configuration DRY with a base template for an application. In per-environment yaml files, you change only what’s needed!

Screenshot 2015-04-07 17.11.29

Deployment is a breeze. We use a Blue/Green deployment strategy so we can safely stop the running containers on our hosts. Here’s what our deploy script looks like:

# pull new image onto box
maestro -f $maestro_file pull $service

# stop the running service
maestro -f $maestro_file stop $service

# clean out old containers
maestro -f $maestro_file clean $service

# start the new containers with the new image
maestro -f $maestro_file start $service
Posted in Uncategorized | Comments Off on Docker orchestration with maestro-ng at Kabbage

Get Docker running on AWS OpsWorks

bhcmIBcI’ve spent the past couple of weeks at my new job doing a couple of things: hiring kick ass Python and UI engineers and getting some build-and-deploy infrastructure set up so the team can hit the ground running.

Long story short: I wanted a way to deploy pre-built Docker images from any repository to hosts running in OpsWorks.

I chose Docker because it would let me get a repeatable, consistent environment locally and on various non-production and production environments. And I’d get there a lot quicker than writing Puppet or Chef recipes and using Vagrant.

Screen Shot 2014-12-05 at 9.32.37 PMWhen it came time to get a non-local environment spun up I turned to AWS due to some networking and security issues around my team’s first project.

Time was of the essence, so I first turned to Beanstalk but found its Docker support problematic. Amazon announced but hasn’t yet released their Elastic Container Service. I ended up picking OpsWorks.

I couldn’t find a lot of advice on the 21st century version of man pages, so I’m writing this up in the hope it helps others, and that wiser folks tell me what I can do better!

Brief OpsWorks primer

Screen Shot 2014-12-05 at 9.34.47 PMOpsWorks is an engine for running Chef recipes based on lifecycle events in the course of a machine’s life.

You start by defining a layer, which is a group of machines that do similar tasks like serve your Web app, run memcache, or host Celery workers.

Then for that layer you define which recipes fire whenever a machine is setup, or an app is deployed to it, or it’s shutdown, etc.

AWS OpsWork and Docker deployment strategy

The best strategy I could find was on an AWS blog post.

Chris Barclay sets up a layer with recipes that install Docker. Application deployments require the OpsWorks instance to pull your code, including its Dockerfile from a git repo and build it locally before running it.

I didn’t like building the Docker images locally from git sources. It ruled out using pre-built community images and opened the door to random build issues on a subset of the boxen.

What I wanted was a way to deploy pre-built Docker images from any repository to hosts running in OpsWorks.

Improved OpsWorks and Docker deployment

I took the code from Chris Barclay and adopted it. You set some key environment variables in your OpsWork application definition and that tells the chef recipe what registry, image and tag to pull and, optionally, the registry username and password to authenticate with.
Here’s the instructions and source to get up and running:

  1. Set up a new stackinOpsWorks. Under Advanced set the following:
    • Chef version: 11.10
    • Use custom Chef cookbooks: https git url to a repo containing the recipes
    • Manage Berkshelf: Yes
    • Berkshelf version: 3.1.3
  2. Add a layer
    • Type: Other
    • Recipes
      • Setup: owdocker::install
      • Deploy: owdocker::docker-image-deploy
  3. Add an App
    • Type: Other
    • Repository type: Other
    • Environment variables:
      • registry_image: The path portion of a docker pull command ala: docker pull $registry_image
      • registry_tag: The tag of the image that should be pulled from the registry ala quay.io/yourusername/yourimage:$registry_tag
      • layer: The shortname of the layer the image should be deployed to
      • service_port: The port on the HOST that will be connected to the container
      • container_port: The port on the CONTAINER that will be connected to the service port
      • registry_username: OPTIONAL username to login to the registry
      • registry_password: OPTIONAL password to login to the registry
      • registry_url: OPTIONAL url to a non hub.docker.com registry ala quay.io

https://gist.github.com/cmheisel/e887a10c2007956e43f6

Posted in Programming, Python, Technology | 9 Comments

DotCloud: Try ALL THE PaaSes

For fun, I’m writing a series of blog posts breaking out what it takes to deploy this app to a variety of Platforms as a service. All of my sanitized config files are on GitHub.

Today I’ll cover deploying twitter-dedupe to DotCloud

DotCloud

0. General thoughts

DotCloud, like Heroku is easy to grok if you’re familiar with the 12 factor app pattern.

I didn’t find the documentation easy to navigate. I spent more time looking for what I needed than I did with Heroku.

DotCloud stores configuration in a JSON file on your container rather than exporting it as environment variables. That required a minor script wrapped around my daemon code.

I was surprised that DotCloud didn’t offer a way to run or test your application locally. This is the company that brought us Docker so I figured I’d get to use it locally to set up my image.

As you’ll see below, it’s surprisingly not easy to run a staging and production version of your app in DotCloud.

1. Provision redis

Adding Redis to my application was super easy. I added two lines to my dotcloud.yml file and I had a redis stack.

data:
    type: redis

2. Deploy the daemon

  1. You configure what to run using a Supervisord config file. The one I used for twitter-dedupe was pretty simple.
  2. You deploy your code using aDotCloud’s command line tool:
    dotcloud push

DotCloud has git and hg integrations but I couldn’t tell from the documentation if I could select which branch gets pushed to DotCloud each time I invoke dotcloud push.

3. Access the logs

During development and for live troubleshooting there’s a handy command to tail the logs live:

dotcloud logs

There weren’t any built-in connections between DotCloud and Loggly.

That meant diving in and configuring syslog on my DotCloud container and wiring it up to Loggly’s syslog endpoint, or wiring Loggly into my application itself. Neither seemed appealing so I skipped it.

4. Do it all again for a staging environment

I couldn’t find any documentation or best practices for running multiple copies of the same application on DotCloud.

Each folder my computer could be tied to one, and from what I can tell, only one DotCloud application.

So to duplicate my application and having a staging environment I followed all the steps to set up my application again in a different folder.

I ended up with something like this:

dotcloud/
├── slateliteprd
│   ├── dcdaemon.py
│   ├── dotcloud.yml
│   ├── requirements.txt
│   └── supervisord.conf
└── slatelitetst
    ├── dcdaemon.py
    ├── dotcloud.yml
    ├── requirements.txt
    └── supervisord.conf
Posted in Python | Comments Off on DotCloud: Try ALL THE PaaSes

Heroku: Try ALL THE PaaSes

For fun, I’m writing a series of blog posts breaking out what it takes to deploy twitter-dedupe to a variety of Platforms as a service. All of my sanitized config files are on GitHub.

Today I’ll cover deploying twitter-dedupe to Heroku

Heroku

0. General thoughts

Heroku is easy to grok if you’re familiar with the 12 factor app pattern.

I had that in mind when I was writing twitter-dedupe so it wasn’t surprising that I picked it to power @slatemaglite

The Heroku docs had answers for all the questions I had.

The Heroku toolbelt provides nice tools like .env files and foreman to manage and run your app in your local environment.

1. Provision redis

Provisioning redis was super easy. I added the Redis To Go add-on to my account.

I added some code to my app to look for the REDISTOGO environment variable set to a redis://url and I was off to the races.

I was a little frustrated by the need to put a relatively proprietary environment variable name into my code. Other Redis add on providers used similar patterns for their name. I don’t know why REDIS_URL wouldn’t suffice for them all.

Update: [Folks at Heroku agree this should be changed and are working on it](https://twitter.com/dgouldin/status/527154532909056000).

2. Deploy the daemon

Deployment was a three step process: configure, deploy and then scale.

  1. You configure what to run using a Procfile. The one I used for twitter-dedupe was very simple.
  2. You deployyourcodetoHeroku using a Git-based workflow:
    git push heroku
  3. Somewhat confusingly on a new project, you need to scale from 0 to 1 or more instances after your deploy:
    heroku ps:scale daemon=1

3. Access the logs

During development and for live troubleshooting there’s a handy command to tail the logs live:

heroku logs --tail

There a lot of Logging addons as well. I decided I wanted to try Loggly on this project.

Heroku has the concept of Syslog drains which will send your log output to any syslog capable system.

Loggly has an easy integration with Heroku. It’ll give you the exact command to add the appropriate drain. It looks something like this:

heroku drains:add https://{{a url here}} --app {{ your app name here }} 

4. Do it all again for a staging environment

Heroku has the concept of forking applications.

So once I had my initial app up and running the way I wanted, I ran:

heroku fork -a myfirstapp mysecondapp

That copied all my addons and configuration. Then I did some get setup so I could push to both:

git remote add test git@heroku.com:mysecondapp.git
git push test master # Deploy
git remote rename heroku prod

After a deploy I needed to scale up test:

heroku ps:scale daemon=1 --app mysecondapp

And I had a running test environment. Deploying to it, testing and then deploying to prod looks like this:

heroku push test master
heroku logs --tail --app mysecondapp
# Do some verification
heroku push prod master
Posted in Programming, Python, Technology | Tagged | 1 Comment

Try ALL THE PaaSes

I chose to deploy twitter-dedpue to Heroku to power @slatemaglite.

For fun, I’m writing a series of blog posts breaking out what it takes to deploy this app to a variety of Platforms as a service. I intend to keep my (sanitized) config files on GitHub and probably some raw notes of what it took to get things set up.

For each service, my goal is to:

  1. Provision redis
  2. Deploy the daemon
  3. Access the logs
  4. Do it all again for a staging environment

I’ll be trying out these services:

  1. Heroku
  2. Dotcloud/Cloudcontrol
  3. Elastic Beanstalk
  4. Gondor.io
  5. Google Compute Engine
  6. Anything else someone recommends to me 🙂
Posted in Programming, Python | Comments Off on Try ALL THE PaaSes